English
- English
- Esperanto
- Afrikaans
- Català
- שפה עברית
- Cymraeg
- Galego
- Latviešu
- icelandic
- ייִדיש
- беларускі
- Hrvatski
- Kreyòl ayisyen
- Shqiptar
- Malti
- lugha ya Kiswahili
- አማርኛ
- Bosanski
- Frysk
- ភាសាខ្មែរ
- ქართული
- ગુજરાતી
- Hausa
- Кыргыз тили
- ಕನ್ನಡ
- Corsa
- Kurdî
- മലയാളം
- Maori
- Монгол хэл
- Hmong
- IsiXhosa
- Zulu
- Yoruba
- অসমীয়া
- ଓଡିଆ
- Punjabi
- پښتو
- Chichewa
- Samoa
- Sesotho
- සිංහල
- Gàidhlig
- Cebuano
- Somali
- Тоҷикӣ
- O'zbek
- Hawaiian
- سنڌي
- Shinra
- Հայերեն
- Igbo
- Sundanese
- Lëtzebuergesch
- Malagasy
- Español
- Português
- русский
- Français
- 日本語
- Deutsch
- tiếng Việt
- Italiano
- Nederlands
- ภาษาไทย
- Polski
- 한국어
- Svenska
- magyar
- Malay
- বাংলা ভাষার
- Dansk
- Suomi
- हिन्दी
- Pilipino
- Türkçe
- Gaeilge
- العربية
- Indonesia
- Norsk
- تمل
- český
- ελληνικά
- український
- Javanese
- فارسی
- தமிழ்
- తెలుగు
- नेपाली
- Burmese
- български
- ລາວ
- Latine
- Қазақша
- Euskal
- Azərbaycan
- Slovenský jazyk
- Македонски
- Lietuvos
- Eesti Keel
- Română
- Slovenski
- मराठी
- Srpski језик

How to Choose C and Z Purlins for Steel Structure Warehouses?
In a portal frame building, main steel columns and rafters carry the primary load. However, choosing the right C and Z Purlins—including roof purlins and wall girts—is just as important. They transfer roof and wall loads to the main frame and keep the steel beams stable. If purlins are not designed well, the roof may bend, leak, or fail under strong winds. This guide explains the basic rules and practical tips for selecting C and Z Purlins for steel warehouses in simple terms.
1. Main Functions of Roof Purlins and Wall Girts
Although roof purlins and wall girts look similar, they carry different loads in a steel warehouse:
• Roof Purlins:
They support the roof panels and carry dead loads, snow loads, and wind uplift. Together with knee braces, they prevent the compression flange of the roof rafter from twisting. When roof horizontal bracing is placed in the second bay, end-wall wind loads pass through the first bay. If there is no separate strut, the roof purlin must act as a compression strut, and its slenderness ratio should not exceed 200. Also, thin metal gutters cannot hold heavy rainwater alone, so an extra purlin is needed directly under the eave gutter.
• Wall Girts:
They carry the weight of wall panels and horizontal wind pressure. Their ends connect to the main columns or wind posts. Because wind blows horizontally, wall girts are usually placed with their web horizontal for better strength. If bottom wall panels sit directly on the ground and connect tightly to the girts, you do not need to calculate vertical bending from wall weight.
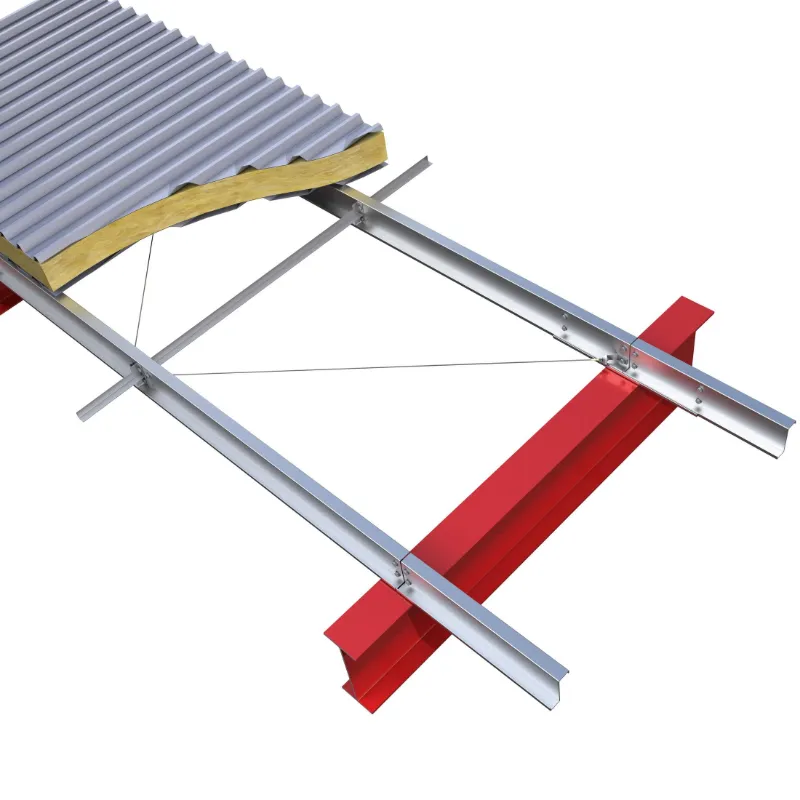
Figure 1: Cold-formed roof purlins fixed by cleats onto steel rafter with sag rods and insulated roof deck
2. How to Choose Purlin Sizes and Shapes (C vs. Z Sections)
Choosing the right size and shape for C and Z Purlins saves steel cost and keeps your warehouse safe:
• Standard Size Ratios:
For solid-web cold-formed steel purlins, the section height is usually 1/35 to 1/50 of the span, and the flange width is 1/2 to 1/3 of the height. Common standard heights are 180 mm, 200 mm, 220 mm, and 250 mm, with standard thicknesses of 2.0 mm, 2.2 mm, and 2.5 mm. To prevent rust damage, the minimum wall thickness should be at least 1.5 mm (1.8 mm or thicker is recommended for industrial workshops). Custom non-standard sections should generally not exceed 3.0 mm in thickness or 280 mm in height unless extra stiffeners are added.
• Z-Purlins for Roofs:
For column spacing between 6 m and 9 m, inclined-lip Z-purlins (with a 60-degree lip angle) are the best choice. Z-purlins can nest and overlap at the supports to form a continuous beam. This reduces bending stress and saves steel. If the column spacing is 12 m or more with heavy roof loads, high-frequency welded H-beams or truss purlins work better.
• C-Purlins for Walls:
When column spacing is 9 m or less, simple-span C-purlins are easy to install as wall girts. For 12 m spacing, continuous Z-girts are preferred. Important rule: Never use continuous girts across door or window openings. Use square tubes or double C-channels around openings instead.
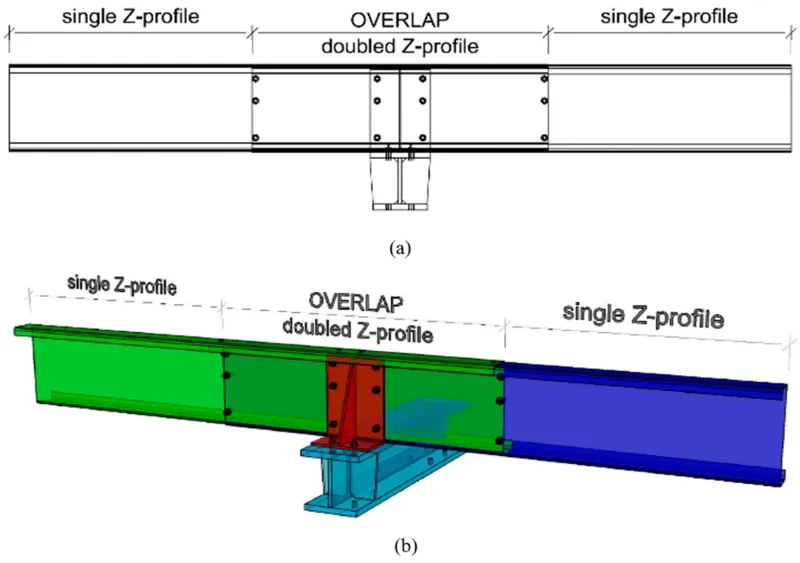
Figure 2: Overlapping nested connection of continuous Z-purlins at rafter support
3. Key Connection Details and Practical Installation Tips
Good connection details prevent roof leaks and structural damage during long-term use. Keep these seven practical rules in mind when checking C and Z Purlins drawings:
1. Overlapping Length for Continuous Z-Purlins:
When Z-purlins overlap at the rafter support, the total overlap length (2a) must be at least 10% of the purlin span. Bolt the overlapping parts tightly to handle the support bending moment.
2. Purlin Cleat Plates and Lifting Gap:
Connect roof purlins to the rafter top flange using cleat plates and at least two ordinary bolts per end (commonly M12 bolts with 14 mm holes). Add stiffener ribs to the cleat plate if the purlin is tall. To avoid hitting the rafter weld seams, raise the purlin bottom 5 mm to 10 mm above the rafter flange.
3. Eave Gutter Support:
At the roof edge, install a dedicated steel gutter bracket and support purlin under the gutter to safely carry heavy rainwater loads.
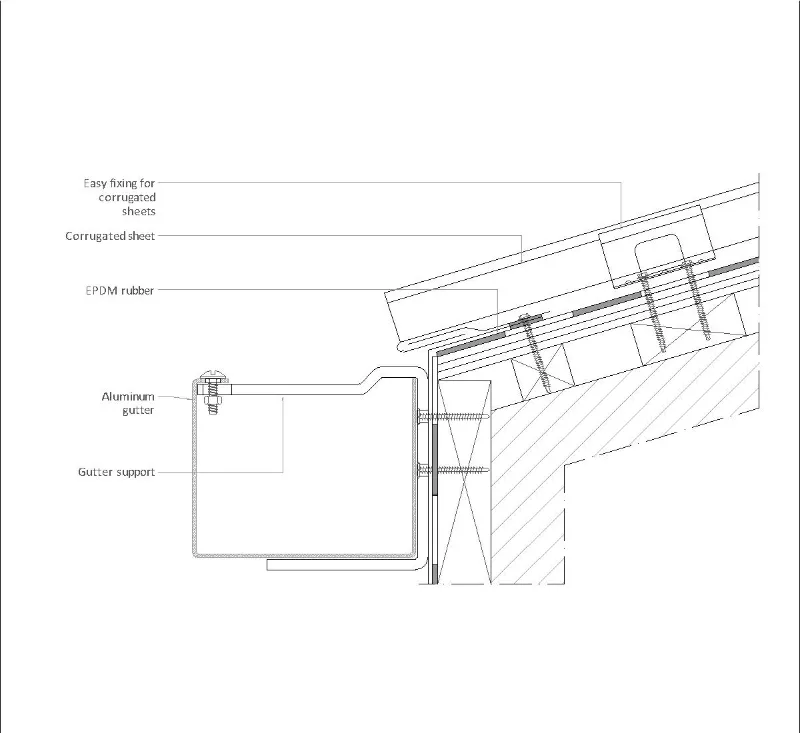
Figure 3: Eave gutter, gutter support bracket, and roof sheet flashing connection detail
4. Sag Rods and Struts:
Cold-formed purlins twist easily without side support. Add one row of straight sag rods at mid-span when the span is 4 m to 6 m. If the span is over 6 m, add two rows of sag rods at the third points. Always place diagonal sag rods and rigid struts (steel pipes with inner bolts) at the roof ridge and top wall girt to transfer forces to the main frame.
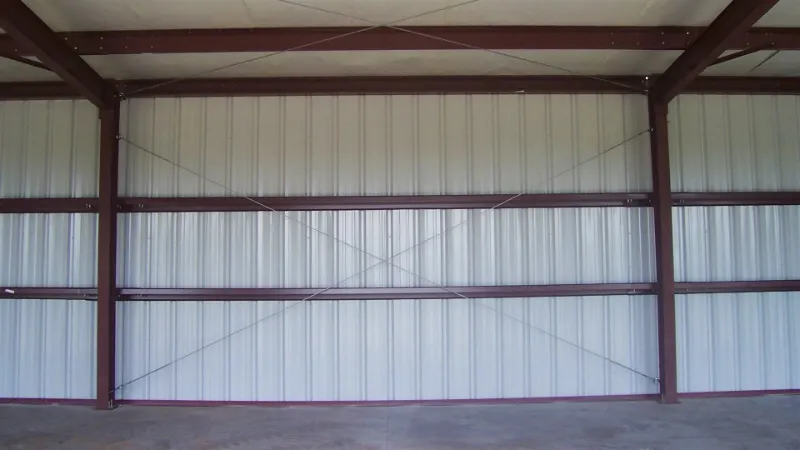
Figure 4: Multi-row wall girts installed between steel columns with diagonal bracing rods
5. Purlin Spacing:
Normal roof purlin spacing is 1.0 m to 1.5 m (commonly 1.2 m to 1.5 m, never over 1.5 m). At high-wind zones like roof eaves, ridges, and step-roof areas, reduce the spacing to less than 1.0 m. Keep the first eave purlin at least 500 mm from the beam edge (or 200 mm if there is no gutter), and place ridge purlins 200 mm to 300 mm away from the ridge center line.
6. C-Girt Opening Direction:
Installing C-girts with the opening facing up makes bolting easier, but dust and rainwater can collect inside and cause rust. Facing the opening downward prevents water and rust buildup, though bolting takes slightly more effort. Choose based on local rainfall and humidity.
7. Hanging Loads:
Never hang pipes, cables, or lights from the thin bottom lip of cold-formed purlins. Always bolt them directly through the center web, or add a small steel cross-beam between two purlins to share the weight.
Summary
A well-designed C and Z Purlins system balances load capacity, steel weight, and easy on-site bolting. By choosing the right section, keeping proper overlap lengths, and installing sag rods correctly, your steel warehouse or workshop will stay safe and durable for decades. If you need technical support or purlin supply for your next project, explore our Steel Structure Warehouse solutions.
Next :
-
Related News
- Which Residential Projects Are Suitable for Modular Shipping Container Homes?
- What Are the Differences Between Prefabricated Container Motel Construction and Traditional Motels?
- What construction costs can be reduced by using steel structure canteen construction?
- What Are the Application Scenarios of Customized Residential Container Warehouse Construction?
- Recommended Roof Slope Values for Portal Frames and Light Steel Roof Structures
- Comprehensive Guide: Selecting the Right Exterior Wall Materials for Steel Industrial Facilities
Leave me a message
New Products





News Recommendations